Complete Posing Pathway
Aug 13, 2019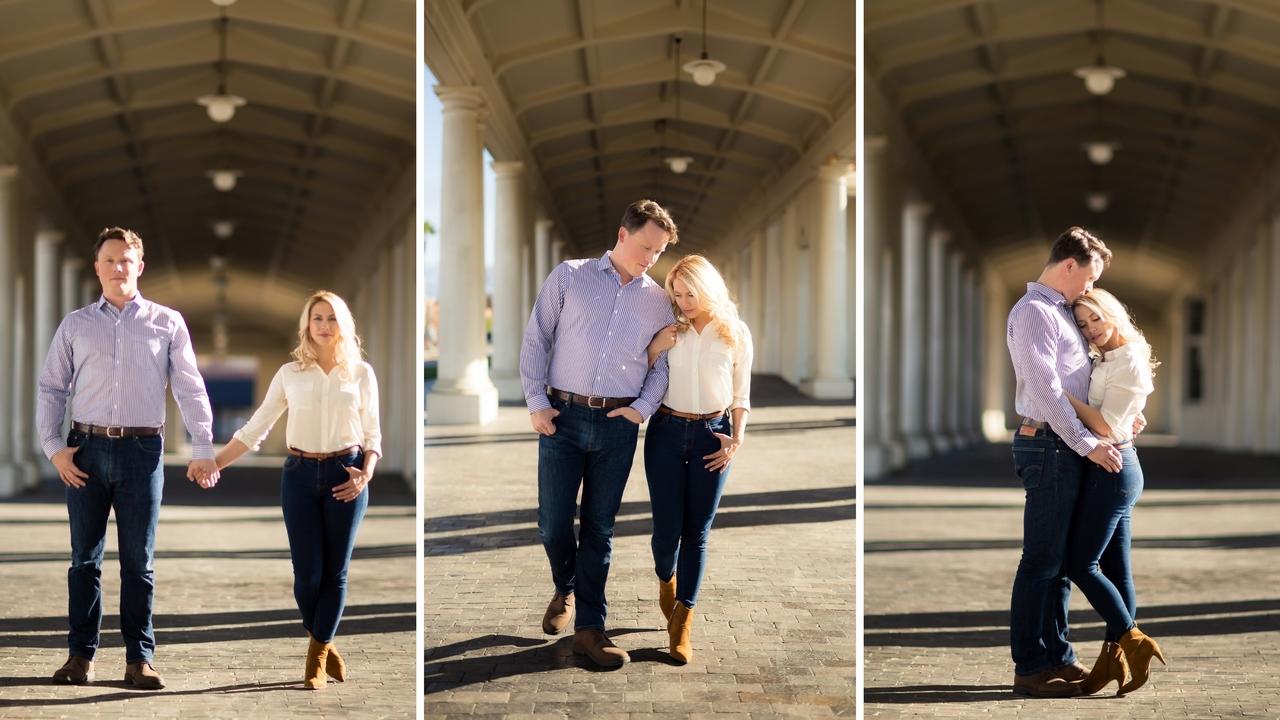
Goal: Improve your communication, posing and directing abilities.
Posing is one of the most intricate aspects of portrait photography. The most subtle change in a pose can distinguish the difference between your subject feeling confident vs. extremely uncomfortable. Often times our clients say "we're awkward, but we want to be natural, fun, & romantic" but that doesn’t simply come from placing them in a pose and photographing them. There is an art involved in directing and communicating with your client to get them to trust you and be comfortable in front of the camera. We're going to break the art of posing down into 4 steps and link you to some of our favorite tutorials on each subject:
- Establish the Posing Goals for Your Subjects
- Master Foundation Posing
- Refine Group Posing
- Stop Memorizing, Start Directing!
Step 1: Establish the Posing Goals for Your Subjects
Remember, when it comes to posing, the principles apply to any subject. We always get questions around, "how do I pose larger subjects" or "is it the same for LGBTQIA+ clients?" It's the same process because what you are learning throughout our education are frameworks. When we discuss men's posing, we are showing you how to create poses that convey masculinity, strength, and presence. However, these poses can apply to any subject/gender. Similarly, when we demonstrate how to create curves and femininity. These techniques can be applied to any client, your job is to understand which techniques/approaches best fit your subjects.
1a. Understand Masculine Posing Goals

Know your subject's goal for the photos – does he want to look tough, friendly, or have an executive presence? Then put him in positions that will yield that look and make sure his posture gives him that feeling.
- From the Wedding Photography Training System: Groom Posing (click here)
- From the Wedding Photography Training System: Standing Posing Demo (click here)
- From the Wedding Photography Training System: Sitting Posing Demo (click here)
- From the Complete Posing Workshop: Men vs. Women - General Posing Goals (click here)
- From the Complete Posing Workshop: Male Client Run Through (click here)
- From the Complete Posing Workshop: Standing And Sitting Pose Demonstration For Men (click here)
- From the Complete Posing Workshop: 15 Second Posing Challenge For Men (click here)
- From the Wedding Photography Training System: Quick Posing Guide For The Groom (click here)
1b. Understand Feminine Posing Goals

Learning the subtle variations in hand placement, expressions, and body language will diversify your portfolio and give you a better understanding of the nuances of feminine posing.
- From the Wedding Photography Training System: Bride Posing (click here)
- From the Wedding Photography Training System: Standing Poses for Bride/Women (click here)
- From the Wedding Photography Training System: Case Study 3-Point Check from Roberto Valenzuela (click here)
- Female Client Run Through (click here)
- From the Complete Posing Workshop: Standing And Sitting Pose Demonstration For Women (click here)
- From the Complete Posing Workshop: 15 Second Posing Challenge For Women (click here)
- From the Wedding Photography Training System: Sitting Bridal Portraits (click here)
- From the Wedding Photography Training System: Bridal Portraits Beauty and Details (click here)
- From the Wedding Photography Training System: Bridal Portraits Front Portraits (click here)
- From the Wedding Photography Training System: Bridal Portraits Working with the Veil (click here)
- From the Wedding Photography Training System: Bridal Portraits Full Length Back (click here)
- From the Wedding Photography Training System: Bridal Portraits Medium Length Back (click here)
- From the Wedding Photography Training System: Quick Posing Guide For The Bride (click here)
Step 2: Master Foundation Posing
There are times when you’re at a shoot and you feel like you’ve run out of posing ideas and struggling to get a certain look or feel, and this is why we’ve developed an entire framework for posing that we call the Foundation Posing Framework, which teaches you what you need to know.
2a. Understand the 5 Foundation Poses

Around 97% of poses come from 5 different positions of the feet. This was how our Foundation Posing Framework was created. By learning these 5 poses from the ground up, you’ll be able to place your couple in any pose and then tweak to your liking with micro-adjustments. The framework also allows you to get in and out of poses quickly.
- From the Complete Posing Workshop: The Five Foundation Poses For Couples (click here)
- From the Wedding Photography Training System: Foundation Posing Tips And Techniques (click here)
- From the Wedding Photography Training System: Foundation Posing - 5 Minute Client Run-through (click here)
- From the Natural Light Couples Photography Workshop: What are the Foundation Poses? (click here)
- From the Complete Posing Workshop: Foundation Posing Client Run Through (click here)
- From the Complete Posing Workshop: Foundation Posing Demonstration (click here)
- From the Complete Posing Workshop: 20 Second Posing Challenge For Couples (click here)
2b. Mind the Details & Make Micro Adjustments to Your Poses

The key to perfecting your posing skills is by studying the nuances. When focusing on the bigger picture you often miss out on the small details that could have made the image 10% better.
- From the Complete Posing Workshop: Three-Point Check (click here)
- From the Complete Posing Workshop: Touch-Points (click here)
- From the Complete Posing Workshop: Body Part Levels of Intimacy (click here)
- From the Complete Posing Workshop: Head Angles (click here)
- From the Complete Posing Workshop: Arms & Hands (click here)
- From the Complete Posing Workshop: Eye-to-Eye Contact (click here)
- From the Complete Posing Workshop: Hip Spacing (click here)
- From the Complete Posing Workshop: Natural Pointers (click here)
- From the Complete Posing Workshop: Pose Mimicking (click here)
Step 3: Refine Group Posing
We can apply the same rules we've established above when it comes to the foundation of group posing, however, it gets complicated when working with multiple people and when we switch up the styling and context of the shot.
3a. Understand Symmetrical/Traditional Group Posing

For a standard symmetrical group pose, you’ll want to make sure that the bride and groom are your centerpiece and then build the pose out from there. Watch for height and symmetry across the group.
- From the Complete Posing Workshop: Group Posing (click here)
- From the Complete Posing Workshop: Handling Large Groups (click here)
- From the Wedding Photography Training System: Foundation Posing (for groups) (click here)
- From the Wedding Photography Training System: Pain Points For Group Portraiture (click here)
- From the Wedding Photography Training System: Symmetrical Posing: Pros vs. Cons (click here)
- From the Wedding Photography Training System: Simple Step-by-Step Guide For Symmetrical Posing (click here)
- From the Complete Posing Workshop: 2-Minute Posing Challenge - Large Group Symmetry (click here)
3b. Create Unique & Stylized Editorial Group Poses

Editorial balanced group portraits can take longer to direct, but this style of photography tends to wow viewers and often garners more online shares. Instead of taking the traditional route, don’t be afraid to try asymmetrical placement and direct your subjects to give serious expressions.
- From the Wedding Photography Training System: Editorial Posing (click here)
- From the Wedding Photography Training System: Simple Step-by-Step Guide For Editorial Posing (click here)
- From the The Complete Posing Workshop: 2-Minute Posing Challenge - Small Group Editorial (click here)
- From the The Complete Posing Workshop: 2-Minute Posing Challenge - Large Group Editorial (click here)
3c. Learn How to Best Communicate with Large Groups
In many ways, handling large groups while taking group portraits closely resembles public speaking. You are trying in equal parts to entertain the group and get them into a pose.
- From the Wedding Photography Training System: Being A Technical Artist vs. Being A Human Artist (click here)
- From the Wedding Photography Training System: Presence & Charisma When Working With Groups (click here)
- From the Wedding Photography Training System: Over vs. Under Communication (click here)
- From the Wedding Photography Training System: Eliciting Genuine Emotions From Your Couple (click here)
Step 4: Stop Memorizing, Start Directing!
Mastering the concept of “being a director, not a photographer” takes a photographer’s client-service to the next level by using cues and direction to create images that tell consistently authentic stories.
4a. Give Directional Cues

Advancements in camera technology minimize the skills needed to operate a camera, but what will never replaced? YOU. Hone your posing, directing, and communication skills to help you become a director and not just a photographer.
- From the Complete Posing Workshop: Words Every Client Will Say (click here)
- From the Complete Posing Workshop: Be the Director (click here)
- From the Complete Posing Workshop: Presence And Charisma (click here)
- From the Complete Posing Workshop: Four Tips on Communication And Ten Useful Cues (click here)
4b. Understand Storytelling

Now that you've understood how to direct the action, learn how to compose and capture these moments as they unfold. Although there is no such thing as a posed journalistic moment, once you've placed your subjects in ideal light it's just a matter of capturing the action as it unfolds.
- From the S3 Workshop: How to Tell a Story (click here)
- From the S3 Workshop: Five Storytelling Examples (click here)
Stay connected with news and updates!
Join our mailing list to receive the latest news and updates from our team.
Don't worry, your information will not be shared.
We hate SPAM. We will never sell your information, for any reason.
