Advanced Engagement Photography Pathway
Jul 24, 2019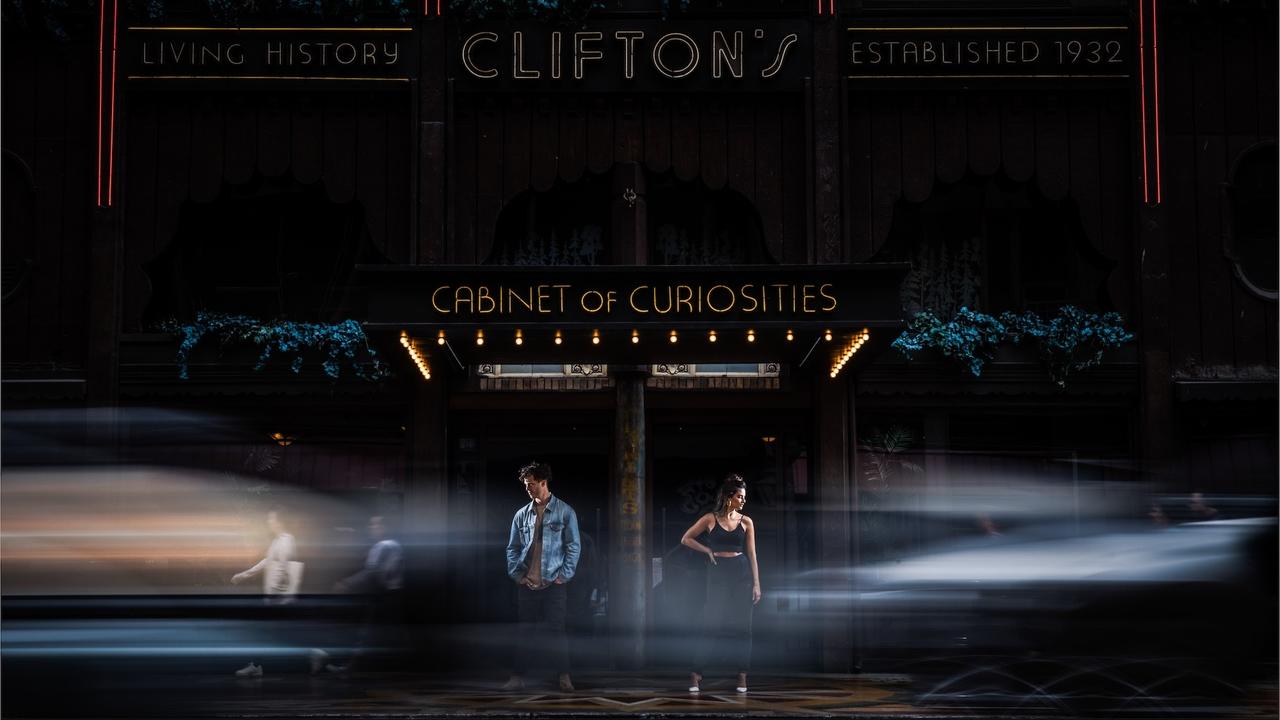
Goal: Expand your creativity and create a cohesive story.
Now that you've mastered your first couple of engagement sessions, let's kick it up a notch. As we mentioned in our Beginner Engagement Photography Pathway, the best way to become a better engagement photographer is to get out there and shoot. We've established our foundation for taking great engagement photos so let's dive into more advanced techniques and practices to elevate your engagement photography. Here are the 5 steps we are going to cover:
- Refine Posing
- Understand Storytelling
- Master One Off-Camera Flash
- Learn Multi-Point Lighting
- Practice Advanced Creative Techniques
Note: Be sure to log in to your account to access the videos listed below.
Step 1: Refine Posing
In our beginner pathway we set you up with our Foundation Posing Framework, but now, let's take it a step further. Understanding the technical art of posing allows photographers to know where a pose is going wrong and how to fix it.
1a. Mind the Details & Make Micro Adjustments to Your Poses

The key to perfecting your posing skills is by studying the nuances. When focusing on the bigger picture you often miss out on the small details that could have made the image 10% better.
Related Premium Video(s):
- From the Complete Posing Workshop: Three-Point Check (click here)
- From the Complete Posing Workshop: Touch Points (click here)
- From the Complete Posing Workshop: Body Part Levels of Intimacy (click here)
- From the Complete Posing Workshop: Head Angles (click here)
- From the Complete Posing Workshop: Arms & Hands (click here)
- From the Complete Posing Workshop: Eye to Eye Contact (click here)
- From the Complete Posing Workshop: Pose Mimicking (click here)
1b. Use Posing Cues to Get Your Couples to Relax

Mastering the concept of “being a director, not a photographer” takes a photographer’s client-service to the next level by using cues and direction to create images that tell consistently authentic stories.
Related Premium Video(s):
- From the Complete Posing Workshop: Words Every Client Will Say (click here)
- From the Complete Posing Workshop: Be the Director (click here)
- From the Complete Posing Workshop: Presence And Charisma (click here)
- From the Complete Posing Workshop: Four Tips on Communication And Ten Useful Cues (click here)
Step 2: Understand Storytelling
Engagement sessions differ vastly from the chaos of weddings in that you get 3-4 hours to just focus on the couple and their story without any other family members or distractions. We've created a simple framework called S3 (shooting stories that sell) designed to help you build the foundation for vivid storytelling.
2a. Build a Story
We learned from our previous pathway that we can use the W.A.V.E to dial in our clients' vision. Use their answer to focus on telling their story through imagery. This three-step process is a simple and easy way to slow down and capture real moments as they unfold.
Related Premium Video(s):
- From the S3 Workshop: How to Tell a Story (click here)
- From the S3 Workshop: Five Storytelling Examples (click here)
Step 3: Master One Off-Camera Flash
In our previous pathway, we barely scratched the surface as to what we can accomplish with flash. Let's cover a few more intermediate techniques that show us how to use one single off-camera flash for dramatic imagery.
3a. Learn How to Overpower the Sun

When you start purchasing more gear and adding higher powered strobes into your kit, you’ll have the ability to create a variety of shots during challenging light throughout the day.
Related Premium Video(s):
- From the Lighting 201 Workshop: Over Powering the Sun - Part I (click here)
- From the Lighting 201 Workshop: Over Powering the Sun - Part II (click here)
- From the Unscripted - Photoshoot BTS Workshop: Laguna Beach Engagement Session (click here)
3b. Re-create Golden Hour

When you've lost that beautiful golden light and need to re-create it, this is when having more than one flash/strobe comes in handy. The end result will vary depending on the wattage of each light source (mainly between using a flash vs. a strobe) but as rule of thumb, you’ll need at least 400ws of power to convincingly re-create sunlight.
Related Premium Video(s):
- From the Re-Creating Golden Hour Workshop: Which Gear To Use To Fake Golden Hour (click here)
- From the Re-Creating Golden Hour Workshop: Capturing Fake Golden Hour Images (click here)
3c. Back Lighting
 We’ve shown you how to light the subjects from the front, but let’s switch it up and place our flash behind our subjects. This can help to create silhouettes, help enhance flares within a scene, and also help illuminate and chisel out your subjects from the background.
Related Premium Video(s):
- From the Lighting 201 Workshop: Back Light to Create Interest (click here)
- From the From Shoot to Post Workshop: Dramatic Environmental Portraits | Shot With Flash (click here)
- From the Lighting 3 Workshop: Background Lighting for Portable Silhouettes (click here)
- From the Lighting 3 Workshop: Double Backlight Environmental Portrait (click here)
- From the Lighting 3 Workshop: Backlighting Rain & Particles (click here)
- From the Lighting 3 Workshop: Wrapping Background Light (click here)
Step 4: Learn Multi-Point Lighting
Now let’s take it one step further and add in multiple off-camera flashes to create images with a higher level of thought and production value.
4a. Incorporate a Front Light & Back Light

Chisel out your subject by creating a two-light setup that helps illuminate your subject just enough to pull them out of the scene and add in a backlight to help separate them from the background.
Related Premium Video(s):
- From the Unscripted - Photoshoot BTS Workshop: Downtown LA Engagement Session (click here)
- From the Unscripted - Photoshoot BTS Workshop: Indian Wedding Nighttime Portrait (click here)
- From the Unscripted - Photoshoot BTS Workshop: Two Lights (click here)
- From the Lighting 101 Workshop: Multi-Point Light Setups (click here)
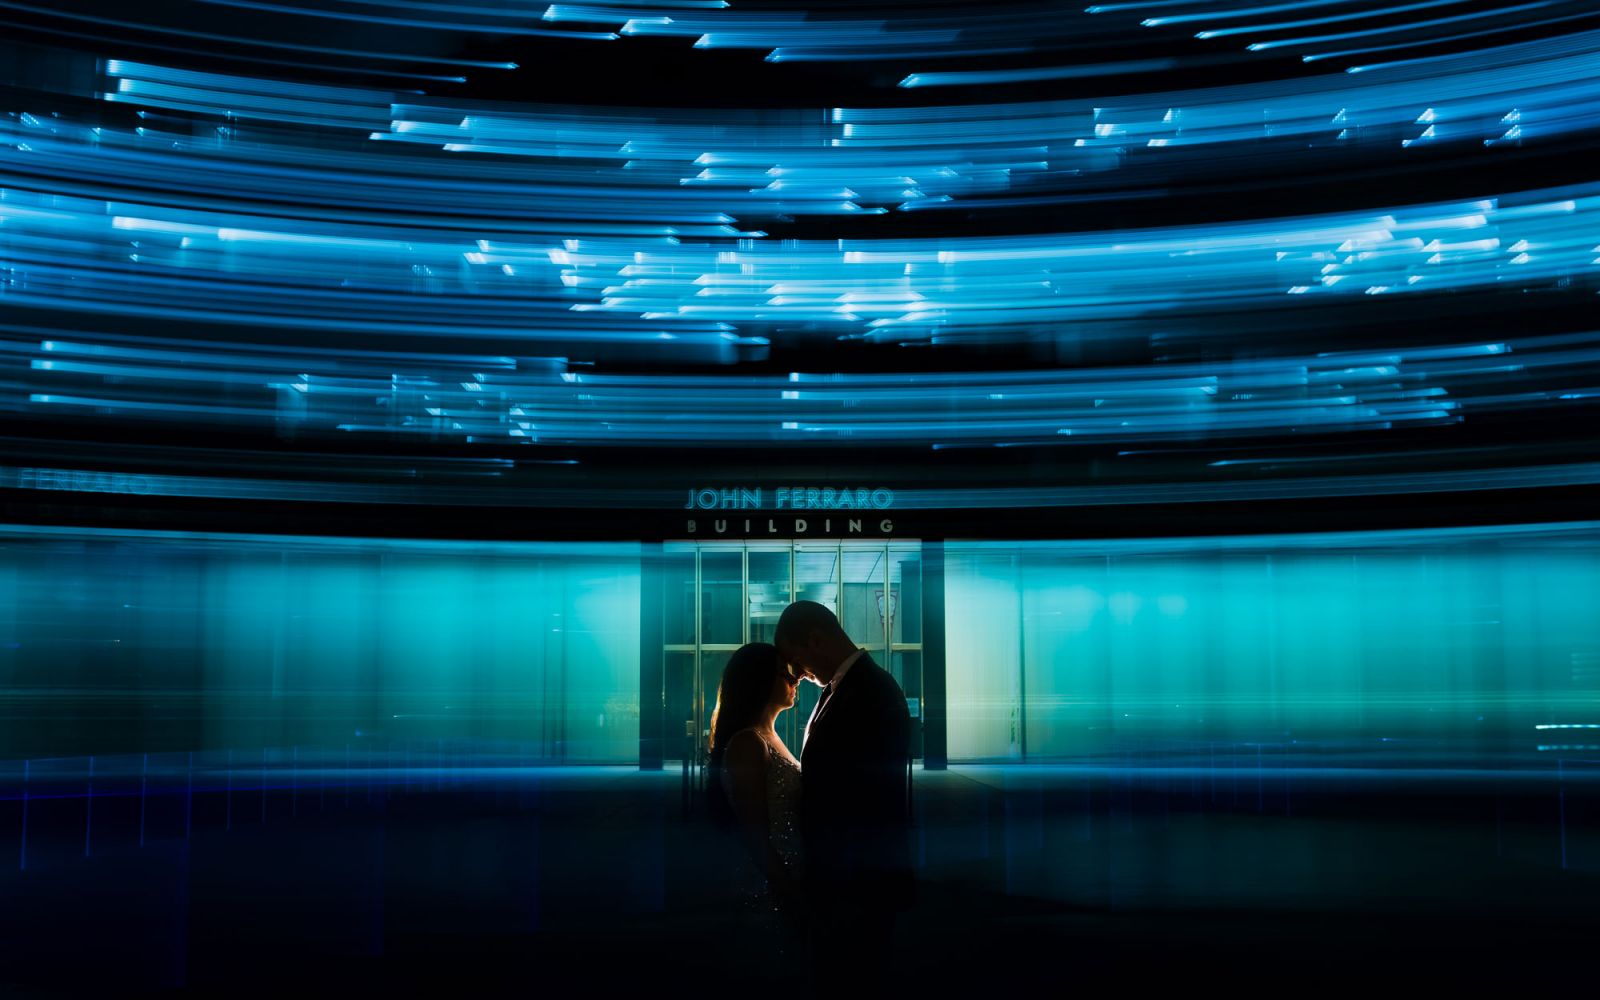
4b. Create a Spotlight Effect

Highlight both of your subjects in the frame using a simple technique taken from stage lighting. This spotlight effect draws in the eye of the viewer to focus directly on the subjects.
Related Premium Video(s):
- From the Lighting 3 Workshop: Two Light Pin for Two Subjects (click here)
- From the Lighting 3 Workshop: Two-Light Pin with Ambient Shutter Drag (click here)
- From the Lighting 3 Workshop: Three-Point Lighting within a Portable Silhouette (click here)
- From the Lighting 3 Workshop: Nighttime vs Day in a Single Exposure (click here)
Step 5: Practice Advanced Creative Techniques
Once you've become comfortable incorporating more than one off-camera flash into our engagement sessions, here are some more advanced, multi-point lighting techniques that will help expand your engagement photography.
5a. Understand How to Manipulate White Balance

Visually change your scene by altering your white balance adding colored gels to balance out your subject’s skin tones. This tutorial from Magmod does an incredible job at explaining how different gels paired with custom white balance settings can completely transform a scene.
Related Premium Video(s):
- From the Lighting 101 Workshop: Coloring Light for Creative Effects (click here)
- From the Lighting 101 Workshop: Creative White Balance (click here)
- From the Lighting 201 Workshop: Visualizing Light Color Shifts (click here)
- From the Unscripted - Photoshoot BTS Workshop: Downtown LA Nighttime Portraits (click here)
- From the Lighting 3 Workshop: How Gels Manipulate Ambient Light (click here)
- From the Lighting 3 Workshop: Three Favorite Gels for Ambient Light Manipulation (click here)
5b. Freeze Your Subject & Add Movement
A fantastic way to help you enhance the level of creativity that you bring to each and every single one of your shoots is to maximize the capabilities of your camera. When working in locations that contain movement (streets, ocean, crowded places, etc.) you can manipulate your shutter speed to showcase that. This technique uses a longer exposure to freeze time and create motion blur.
Related Premium Video(s):
- From the Lighting 201 Workshop: Getting Crazy with the Whip Pan (click here)
- From the Unscripted - Photoshoot BTS Workshop: Laguna Beach Engagement Session (click here)
- From the Unscripted - Photoshoot BTS Workshop: Downtown LA Engagement Session (click here)
- From the Unscripted - Photoshoot BTS Workshop: Orange County Wedding (click here)
- From the Unscripted - Photoshoot BTS Workshop: Long Exposure Shutter Drags (click here)
- From the Unscripted - Photoshoot BTS Workshop: Long Exposure Composite (click here)
- From the Lighting 3 Workshop: Two-Light Pin with Ambient Shutter Drag (click here)
- From the Lighting 101 Workshop: Case Study 7 - Shutter Drag Composite (click here)
5c. Use Specialty Lenses for Creative Effects

A tilt-shift lens is meant to throw the focus plane off, helping you focus on multiple subjects to create interest or correct perspective. At first, it is difficult to navigate the functionality of a tilt-shift lens, but like any other technique, it’s a matter of trial and error. Understanding how the focus plane works is the main hurdle to cross because it is such a non-traditional perspective. The image above was created using a Canon 90mm f/2.8 Tilt-Shift lens.
Related Premium Video(s):
- From the Wedding Photography Training System: Tilt-Shift Dreamland (click here)
- From the Panoramic Stitching Workshop: How to Use a Tilt-Shift Lens (click here)
- From the Wedding Photography Training System: Free Lens (click here)
5d. Stitch Together Images to Create A Panorama

Panoramic images hold the ability to capture an expansive space and compress it into a single image. Create high-resolution environmental portraits via the Brenizer Method that showcase your subjects and their surroundings. Wide aperture panoramic stitching works best with lenses that give you a shallow depth of field and greater compression.
Related Premium Video(s):
- From the Panoramic Stitching Workshop: Capturing a Panorama (click here)
- From the Unscripted - Photoshoot BTS Workshop: Wide Aperture Panoramic Stitch (click here)
5e. Use Accessories in Front of Your Lens for Flare Effects
A great way to add interest to your scene is to use objects with reflective and prismatic properties to create fascinating flare characteristics in your image.
Related Premium Video(s):
- From the Wedding Photography Training System: Foreground Elements (click here)
- From the Wedding Photography Training System: Creative Angles & Effects (click here)
- From the Wedding Photography Training System: Prism (click here)
- From the Lighting 3 Workshop: Shooting Through The Foreground (click here)
- From the Wedding Photography Training System: Hotel Room Reflections and Creative Elements (click here)
5f. Creating Double Exposures In-Camera

Sometimes we have to turn even the worst locations into something extraordinary and having a couple of tricks in your back pocket will really help you out for times like this. Double exposures are a great way to add interest and create magic from your basic surroundings that will definitely awe your clients!
Related Premium Video(s):
- From the Lighting 3 Workshop: Flashed Double Exposures Layered vs Clean Textures (click here)
- From the Lighting 3 Workshop: Hollywood Two-Light for Subjects (click here)
- From the Lighting 3 Workshop: Flashed Double Exposure - Adding Scene Elements (click here)
Stay connected with news and updates!
Join our mailing list to receive the latest news and updates from our team.
Don't worry, your information will not be shared.
We hate SPAM. We will never sell your information, for any reason.
